Feb 25, 2016

Dig Deep for those Greens - Art Tips

NEW WORKS FROM THE STUDIO OF ART BY WENDY

Yes, there will be Green again!!
Red greens, blue greens, soft gentle greens to sink into and those bright garish greens that stop you short!! After last week's crazy Demo Week (see here for more on that) I am ready to get back into the studio and paint.

My best friends, the chickadees, are back in the garden! They are the ones that really bring the life back to the yard.  They chitter, they chatter, they bath in the birdbath.  They flit and they flirt.  Best of all they bring their babies to feed. So cute watching the little ones crying for food, bathing in the bird bath, and sulking when they can’t get their way.  Other birds come and go, never staying long, but the chickadees are my real backyard buddies.  

So of course they need to be featured in my work!!

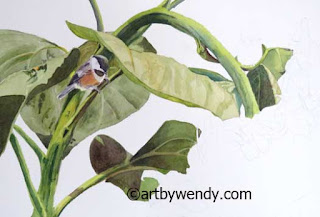
Sunshine and Sunflowers WIP - Watercolour

My plan: chickadees and sunflowers.  (Okay I admit it.  I am really into the summer more than spring.  But I am ready, aren't you?)

My picture Sunshine and Sunflowers,  is a work in progress now but already you can see the problem.  Green.  I love it: to look at on a summer day, to play on, to feel the softness as I settle down with a book.  But to paint!  It's a challenge.  Everything looks green, local colour is green, green everywhere.  But the whole picture can't be one be blog of green!!

My palette: Daniel Smith GreenGold (GG) , Ultramarine Blue (UB), Alizarin Crimson (AC), Aureolin,(A) Gamboge (G), Burnt Sienna(BS).   (The GreenGold has to be Daniel Smith’s as the other brands just don’t seem to work the same way.  This greengold is the colour of the moss on the branches shining in the sun.  It is that lovely blue green (when you add UB) that brings to mine the firs as you walk down a forest trail.  It just seems to be my kind of coastal green.)

The Challenge: build my greens just with this palette.  I know, easy to grab lots more tubes of paints with greens and browns, and golds, even reds.  But lots of tubes, introduces lots of new colours and suddenly things don’t blend any more.  Stay with your palette and dig deep, there are many subtle ways to suggest green with what you have.  Here is a sample of some of the greens I have created with mixing  UB, A, AC and G with the GreenGold.  The UB + GG I did two samples.  One with a little UB and one with lots.  Just dropping in a little AZ changes it again.  So many greens and green suggestions right here.  


Sample strip of some of the greens mixed with GG.
Note the changes with the purple glaze.(UB + AC)

Those greens were only created with weak and strong mixes.  What about all the colour variations when you start to glaze over them.  Glaze over with a blue, a yellow or a red.  More colours.  I included a glaze of purple (UB + AC) over the test strip once again, lots of different grayed down shades.  Of course another layer creates more. If you go back and look at Sunshine and Sunflowers WIP again, you can see how they blend together and read as green but really are quite different!!

Follow up from last week's post: The 3 presentations went well.  I met some wonderful people, made new friends, and got totally inspired. A really special thank you to Jackie who took the time to send me this comment Sunday night after a full day workshop yesterday on Marketing. 

"Hi, Wendy.
  I just wanted to let you know how much I enjoyed your Marketing Your Art Workshop.  I learned SO much!  It is the BEST workshop I have ever been to on ANY subject.  Thanks so much." 

It really made the whole day worth it for me to hear that.

Well back to work, hope to post the finish picture next week.  (Of course you know what the next challenge will be - working with yellow.  No easy task!!)

 Be sure to like and share my posts. You won't miss a single one if you  Like my Facebook Page  or follow by email.    (see sidebar, top right corner on my blog page)
Have a great artful day, Wendy
For Commission Works see here
For Private Drawing Lessons see here
For Marketing Mentoring see here
For Marketing or Art Presentations Contact Wendy 

Feb 18, 2016

Preparing to Present or 8 Steps to Success- Art & Marketing Tips

NEW WORKS FROM THE STUDIO OF ART BY WENDY

I know this article isn't for you! - You are an artist, not a presenter. 

You work hard on your art, you are no expert, And maybe you didn't go to Art School. 
But the day will come when someone will say to you

"Wow! That is really neat what you are doing, how did you do it?"

Teaching can sneak up on you like that or can be a direction you want to go. Either way preparation beforehand can make it or break it.

Wendy - Demo - Using Technology to Present Your Art Work

There are huge payoffs for you if you do head down that road. 
-    You meet lots of new and interesting people, both artists and art lovers
-    You learn so much, teaching someone else to do something is a great way to really learn it yourself
-    Your confidence in your work will grow and will be reflected in your work
-    Your network will grow
-    You will have another income stream from your art

But Success means Preparation.

Here are my 8 Steps to Success:

1.     Brainstorm - When I have a topic I begin making notes of things I want to say.  No order, just thoughts.  Writers call it a free flow of ideas.  I jot things down wherever I am.  3 am in the morning is often an "Aha Moment".  I keep paper and pencil by the bed so I can jot a thought and go back to sleep.  (Sometimes those scribbles are hard to read as I never turn the light on. But even a word or two will bring the idea back and I can flesh it out from there.) Think about not only the points you want to cover but activities for your group to do to practise it.  A sit and listen talk will not teach as much as an interactive one. 

My brainstorm notes are in many forms - Demo Preparation for 'Using Technology to Present Your Art'

2. Organize and Prioritize - After a day or two I will sit down with my scribbles and pick the ones I like and begin to put things  in an order.  If you are demoing a particular technique, that will be your focus.  Often I am presenting Business and Marketing skills which are broad topics.  Keeping things simple and not overwhelming is a harder task. For my Technology Presentation I decided to organize technology around the 3 main tasks of Marketing Your Art: Publicity, Networking and Point of Sale. Once I had a structure things really fell into place.

3. Prepare An Outline - Seems like the same as organizing but it is different.  You will not be able to read off your paper. You need to face your group and talk.  A quick peek at your notes is all you get.  There isn't time to read a paragraph, only a few words.  Impossible you might think but remember, you are talking about what you know, not some foreign topic that you just spent a few days researching.  (Those horrible school presentation memories will try and beat you down.  Let them go, this is your topic, something you know and do all the time with your art. A few words will remind you what you want to say).
 If there is a particular quote, reference or note I want to make, I will read it out if I have to.  But it will be short and then I am back to 'speaking live'.

Hands on Activities are Important - This is from my demo "Working with Multiple Reference Photos" 

4. Organize Your Materials - Once your outline is ready, getting materials together is easier.  You know where you are going. I first sit with my paper and visualize my presentation:  from set up to take down.  This really helps in figuring out what you need. Beware: the tendency here is to panic and bring too much.  Relax, it happens to everyone. The fear of not having enough, that 'dead space' is with every presenter. Pack what you need, bring an extra activity/note to keep you comfortable and confident.  

5. Practice - I mean really practice. Go into a room, take your notes and talk out loud.  Say what you plan on saying.  Hearing your voice gives a better feeling for how you will be 'thinking on your feet' when you presenting.  Just reading over you notes and 'thinking through your presentation' is not the same. Jot a note, an example or point you feel you will need as a reminder on  your outline. (I often use different colour pens so I am alerted to that extra point)

6. Packing - Take some time here.  As you are packing you are again visualizing the presentation and activities and it is an opportunity to add things you had forgotten.  Keep it manageable.  Try and condense it to one or two trips from the car,  that you can manage alone.  Who knows where the parking will be or how much help you will have.  I find there is lots of help to pack up but no one is there when I arrive. 
For a 3 hour demo, one load should do it. My favourite item: my dolly

7.  A Press Kit - Easy to forget.  Your focus is on making a good Presentation but this is also a networking/marketing activity.  Have a press kit ready:  a bio/statement page, information on your next events, sign up sheet for your newsletter, and business cards or flyers for each person. 
Sample Press Kit and Work Samples - yes have prices on everything. 

8. Samples of Your Work - You are an artist, that's why you are there. Your workshop participants want to see 'what you do'.  Take one or two originals, if possible and some cards,  prints or a book showing some of your other work. That 'dead space' you were worried about can be filled talking about your work and where you are going.

9. Relax and enjoy yourself - Take deep breaths, don't rush. You know your stuff, you do it all the time. 

Special Note: There is only 1 spots left in my all day Marketing Workshops running this month. Sunday, Feb 21 - FULL, Sunday, Feb. 28 - 1 Spots left.  This workshop is only offered in February each year.  More information

 If you can't make the workshop there are other alternatives, I offer 1-to-1 Marketing Sessions focusing on topics of your choice and I am also happy to present to Art Groups on particular topics related to Marketing Your Art.

 Be sure to like and share my posts. You won't miss a single one if you follow by email or Like my Facebook Page.
Keep up with all the art events by joining my email list (see sidebar)
Have a great artful day, Wendy

Feb 11, 2016

Working Really Really Small?!! - Art Tips & Techniques

NEW WORKS FROM THE STUDIO OF ART BY WENDY

Have you every tried it?
Working Small?
I mean small. 

  Not a small painting but a miniature - 3 x 4 inches or less!
FEELING THE EDGE - 3.5 X 2.5- Ink & Watercolour

You big 3 foot by 4 foot painting artists may think I am crazy but I do love small things and I enjoy painting miniatures.  It really is a different kind of art.  It invites you to come closer and look carefully.  Get right into the art.

Painting a miniature is like every part of the creative process, it has its own materials and techniques. Some artists paint in oil and acrylic but I love watercolour.  My favourite is watercolour with ink work.
GATHERING ON THE EDGE - 2.5 x 3.5 - Ink & Watercolour

For mix media projects like mine, I find Arches 140 lb hot press paper works really well.  The ink flows nicely and doesn't bleed. I like a crisp line with my ink.  The watercolour works well on this paper but it does behave differently than when working with cold press paper.  I find it really grabs the pigment when I do wet onto dry.  However, it does allow for lots of neat blending of colours with the wet on dry process.  Check out the detail on the wing of my eagle in Watching the Edge.

Wing Detail from WATCHING THE EDGE - Ink & Watercolour (Full picture below) Pretty neat eh?! When you consider that whole eagle is no bigger than a loonie.  (Canadian slang for a 1 dollar coin)

One thing I do find with miniatures is that a magnifier is verrrrrrrry useful.  I don't use it all the time but painting the claws, eyes and beaks on these tiny birds is exacting.  A magnifying glass is good to have. This little one pictured here comes with an adjustable stand and light.  It also has a smaller circle inside the glass for even greater magnification.  

My set up - note the magnifying glass has a light that can be set to shine onto your work.  For an eagle's eye you need all the help you can get!!


To do my ink work I use the Micron Pigma pens - 005 & 01.  They have  a nice flow, are archival, dry quickly and will not smear when watercolour is applied.  If I want to go back later and add more detail they work well on top of the watercolour as well. 

My favourite brushes

I have a selection of brushes that I like to use with my minis.  These are my favourite right now.  From Left to Right:  
-18/0 Liner by Comell - It is wonderful for those tiny special strokes (from Micheals)
- Expression Series Robert Simmons, I have 3 from this series, nice to hold,  there is a Flat Shader, Liner, and Spotter
- No. 8 Chisel Blender- Simply Simmom, I use this for scrubbing and lifting pigment.  It does a great job without damaging the fibers of the paper too much
-No. 3 Cotman round.  Good for the larger areas (Yes, there are larger areas)
- No 4 & No 2 Jack Richeson Series 7130. These are new brushes that came with my new Jack Richeson Field kit.  They are great little brushes and again, very good for the larger areas.

Some of the issues with brushes is having a brush that carries enough paint to work with and has good water control.  Too much water and not enough water are still problems no matter what size the picture is!

The two miniatures Feeling the Edge and Gathering on the Edge  are headed for the International Miniature Art Biennale 2016 happening in Ville-Marie, Quebec, Canada.  It runs June 3 - September 18, 2016.  It is a contemporary art show so I thought it was a good place for my tangled forest theme with my eagles.  My tangled forest theme is about adapting to change and hope for the future.  As habitats are changing for mankind and the animal world change is the order of the day.  My eagles have adapted and are finding new ways to live in their strange new world.

WATCHING THE EDGE -  2.5 x 4.25 - Ink & Watercolour

This third picture Watching the Edge was not able to go to the Biennale as it is too big!!  4 Inches is the maximum for any side. So that little .25 inch needed to be shaved.  I just couldn't do it! So he stays with me.  I love the picture but it did mean quickly coming up with a second picture. Next time I will be a little more meticulous in reading the requirements for the show!!

Special Note: There are only 2 spots left in my all day Marketing Workshops running this month. Sunday, Feb 21 - FULL, Sunday, Feb. 28 - 2 Spots left.  This workshop is only offered in February each year.  More information

 Be sure to like and share my posts. You won't miss a single one if you follow by email or Like my Facebook Page. Keep up with all the art events by joining my email list (see sidebar)

Have a great artful day,
Wendy

Feb 4, 2016

Are you Ready to Welcome The Red Fire Monkey!??!

NEW WORKS FROM THE STUDIO OF ART BY WENDY

 The Chinese New Year is coming - February 8, 2016.  The Year of the Red Fire Monkey

THE FIRE MONKEY - by Becky McMahon - Chinese Brush Painting 

My guest today, an artist friend, BeckyMcMahon of Triskel Tree Creations. Becky is a Chinese Brush Painter and each year she creates her own interpretation for the Chinese Horoscope.  I am pleased to have her Fire Monkey as a guest today. 

Becky says,"Monkeys are clever, intelligent, have a good sense of humour and open minded. Focus is extremely difficult for them and they can be deeply insecure. But they are never at a loss for words or ideas and can usually maneuver around any troubles their weaknesses get them into. Monkeys are incurable optimists and are generally good with people. 

This year is good news for Artists.

 The Fire Monkey's intelligence and inventiveness bodes well for your artistic creative side.  Also, his nimble mind mine means he is quick to see outside the box and ready to try new things. ( Not surprising Leonardo da Vinci was born in the Year of the Monkey.)

The Monkey is also fast and mischievous. A warning that changes will  come, and quickly.  Long term plans may fall aside, quick thinking and adjusting to change may be in order. 
Sounds exciting, eh?!

Don't let this year happen, be ready for it! 

First off, clean up your house.  Sweeping out the bad luck and getting ready for the good luck is important. Cleaning the house also means cleaning up business affairs, finishing up old jobs, getting your financial books in order.  (Even Revenue Canada supports those values!!)

Secondly, prepare your food ahead for the big day.  Cutting with knives on New Year's Day may 'cut off' your good luck.  Making Red and Gold Banners to decorate; honoring your ancestors; and getting fresh flowers are next on the list. I have already started here.  In China, it is Lucky Bamboo and Orange Trees but I have new tulips and primroses ready to go. 

These are all good things, for you as an Artist, removing the clutter from your everyday life will definitely leave you free to tap into the creative spirit. You will be ready to jump 'outside your box' to try new things.

Have a great Chinese New Year and I hope it brings big creative changes for you. 

Me, I have to get back to my books, not all my financials are done yet!!

Be sure to like and share my posts. You won't miss a single one if you follow by email or Like my Facebook Page. 
 Keep up with all the art events by joining my email list (see sidebar)
 Have a great artful day, Wendy